25 Oct 2025
How to Install a Channel Drain?
Have you ever stepped outside after a heavy downpour only to find your driveway transformed into a mini lake? You are rushing to work and as you approach your car, you are met with ankle-deep water pooling right where you need to walk. It is frustrating, isn’t it? Many homeowners face this exact scenario when rainwater has nowhere to go on flat surfaces. Without proper drainage, water does not just disappear, it sits there, creating slip hazards, damaging your property and even seeping towards your home’s foundation.
If you have wondered what is a channel drain or how to install channel drain systems to solve these problems, you are in the right place. This comprehensive guide will walk you through everything you need to know to keep your property dry and protected.
What Is a Channel Drain?
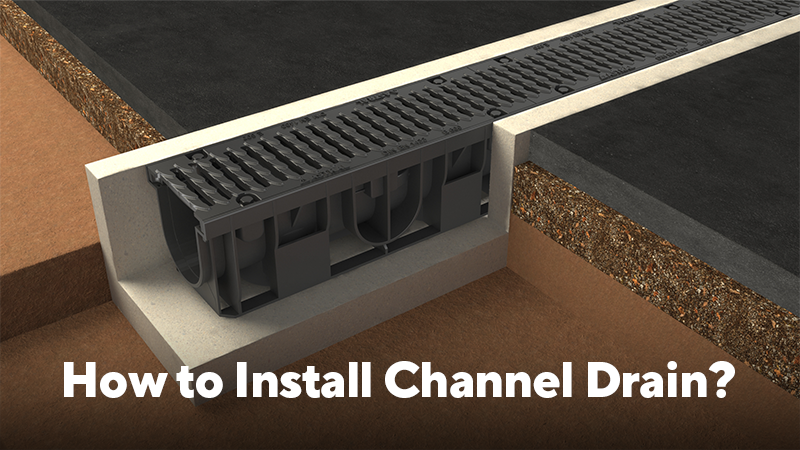
A channel drain, also known as a trench drain or linear drain, is a surface water management system designed to collect rainwater over a large area and direct it safely away from your property. Channel drains capture water along their entire length, which makes them suitable for driveways, patios and other flat surfaces where water tends to accumulate.
These systems consist of long, narrow channels made from durable materials like concrete, polymer or uPVC, topped with removable grates. The grates allow water to flow in while keeping leaves and debris out and thus preventing blockages.
Channel drains work by sitting slightly below the surrounding surface level, creating a natural path for water to follow. When rainwater hits your driveway or patio, gravity guides it into the channel and through to your existing drainage system. This prevents water from pooling on impermeable surfaces, reducing the risk of flooding during heavy rainfall.
Where Should You Install a Channel Drain?
Choosing the right location is important for effective drainage.
- The most common installation point is across your driveway, particularly in front of garage doors, where water naturally collects and might otherwise flow towards your home.
- Driveway drainage channels are also highly effective along patio edges, garden pathways, pool areas and any flat surfaces where you notice water pooling after rain.
- Consider installing channel drains on surfaces with minimal slope, where water would otherwise sit stagnant. However, remember that any drainage system needs somewhere to discharge the collected water.
- Your channel drain must connect to an existing drainage outlet, soakaway or storm drain.
- Never install a drainage system without a proper outlet, you will simply move your water problem elsewhere.
When planning how to install channel drain systems, look for the lowest points in your landscape. Water always flows downhill, so these natural collection areas are suitable for it.
Tools and Materials Needed for Installing Channel Drain
Before starting your installation, gather these essential items:
Materials
- Channel drain sections with grates
- End caps for closing off drain ends
- Drainage pipe and connectors for outlet connection
- Sand or gravel for the foundation base
- Ready-mix concrete for securing the system
- Duct tape to protect grates during installation
Tools
- Shovel or spade for excavation
- Spirit level or string line for checking slopes
- Tape measure for accurate sizing
- A handsaw for cutting drain sections to fit
- Rubber mallet for positioning adjustments
- Trowel for concrete work
- Safety gloves and goggles
- Wheelbarrow for moving materials
- Compactor (optional) for base preparation
Having all tools ready ensures your driveway drainage channel installation proceeds smoothly without delays.
How to install a Channel Drain?
Below are step-by-step points to help with installing a channel drain:
1. Mark the Trench
Start by marking where your channel drain will sit. Allow at least 100mm space on each side for concrete backfill. Plan for the drain grate to sit 2mm below the finished surface level.
2. Dig the Trench
Excavate a neat trench deep enough for your drain, plus a 50mm base layer. The trench width should accommodate the drain with space for concrete on both sides.
3. Prepare the Base
Add 50mm of sand or gravel to the trench bottom. Use a compactor to create a firm, level foundation for your driveway drainage channel.
4. Check Levels and Slope
This step is important. Use a string line and spirit level to ensure the trench slopes towards your drainage outlet. Without a proper slope, water will not flow effectively.
5. Assemble Channel Sections
Lay out your channel drains starting from the lowest point. Connect sections using the provided slots or connectors. Cut sections to fit using a handsaw if needed. Cover grates with duct tape to prevent debris from entering during installation.
6. Connect the Outlet
Fit the end cap to the closed end and connect the outlet to your drainage pipe. Ensure all connections are secure and watertight.
7. Backfill with Concrete
Pour concrete along both sides of the channel, ensuring the grate top remains slightly below surface level. Tap gently with a rubber mallet for proper positioning. Allow 24-48 hours for concrete to cure completely.
8. Test and Finalise
Pour water into the system to test drainage flow. Once satisfied, remove protective tape and finish the surrounding area.
Why is Astral Channel Pro a Top Choice for Channel Drain Installation?
Engineered specifically for Indian conditions, Astral Pipes’ Channel Pro tackles everything from monsoon downpours to everyday water runoff with ease.
- Premium PolyPropylene Construction: Made with high-quality PP for superior durability and performance.
- Efficient Water Drainage: Designed to drain surface water effectively, preventing water accumulation.
- Versatile Application: Suitable for paved surfaces, landscaped areas, industrial zones and commercial spaces.
- Smooth Internal Surface: Enhances hydraulic discharge capacity for faster drainage.
- UV Resistance: Withstands harsh weather conditions and maintains durability over time.
- Variety of Grating Options: Tailored to different load capacities, ensuring optimal performance across applications.
- Easy to Install and Maintain: User-friendly installation process and low maintenance requirements.
Water pooling problems do not have to be permanent headaches. Now that you understand what is a channel drain and how to install channel drain systems properly, you can tackle drainage issues with confidence.


